
Gourmet Grilled Cheese SandwichesThe Classic American Comfort Food
- Dec 3, 2021
- 4 min read

My favorite comfort food is a grilled cheese sandwich. What is yours? When I think about sandwiches, I am fascinated with how they came to be.
The person credited with creating the first sandwich is John Montague, the Fourth Earl of Sandwich. Montague was patron to Captain James Cook, who explored New Zealand, Australia, Hawaii, and Polynesia in the late 1700’s.
Legend has it that Montague liked to gamble and played cards for hours at a time, refusing to leave the table for meals. One evening, Montague ordered his valet to bring him salt beef tucked between two slices of bread. Montague downed the snack and never missed a hand of cards. This new dish grew in popularity and was named after its creator, the Earl of Sandwich. Who invented the grilled cheese sandwich? In the United States, the first reference to a “melted cheese” sandwich appeared in 1902 in Sarah Tyson Rorer’s Mrs. Rorer’s New Cookbook; and an important invention would contribute to the sandwich explosion. In 1927, Otto Frederick Rohwedder designed a machine that would slice bread, and by 1933 bakeries sold more sliced than unsliced loaves of bread. During the Great Depression, Americans ate open-faced “melted cheese” sandwiches because they were affordable. Some historians believe a second slice of bread was placed on top of the sandwich to make it more filling, providing more sustenance for the American work force. I remember my father talking about what he ate during the 1930’s—old cheese and stale crackers. I think the “melted cheese” sandwich sounds more appealing. I am surprised that the “melted cheese” sandwich which helped Americans survive the Great Depression has evolved into a classic American comfort food. My recipe for my favorite comfort food was a fluke. I was cleaning out my fridge and wanted to use up cheese I had on hand before it passed its prime. It was one of those “everything but the kitchen sink” creations. My husband claims it’s the best grilled cheese he ever ate.
After all the cooking we did for Thanksgiving and before we begin our Christmas baking, treat yourself to my grilled cheese sandwich. What could be better than buttered bread grilled to a golden brown with gooey cheese inside? It’s easy – and it’s the cheesiest!
Gourmet Grilled Cheese Sandwiches Makes 4 Sandwiches
My hairdresser, Randy Kehn, recommends adding Parmesan cheese to the softened butter for a Parmesan-crusted sandwich. He suggests 1 tablespoon of Parmesan for each tablespoon of butter. I tried this, and it is to die for! What is your secret to the perfect grilled cheese? 8 tablespoons butter, softened 8 tablespoons Parmesan cheese (optional) 8 slices sourdough bread 4 slices Provolone cheese, about 4 ounces 4 thin slices mozzarella cheese, about 4 ounces 4 slices fontina cheese, about 4 ounces 2 ounces crumbled Gorgonzola cheese 8 slices ripe tomatoes
Preheat a large electric skillet to medium heat. In a small bowl, combine softened butter with Parmesan cheese. Pair up slices of bread for sandwiches. Spread 1 tablespoon of butter on the outsides of each slice of bread. Layer the 4 cheeses on the unbuttered side of the bottom of each sandwich. Place 2 tomato slices on top of cheese. Place the top slice of bread on each sandwich with the buttered side out. Grill the sandwich in a skillet over medium heat until golden brown. Immediately place a lid on top of the skillet. After 2 minutes, turn and grill until the second side is golden brown and cheeses are melted. Serve immediately.
Shopping for cheese: Buy only pasteurized solid cheese. If unpasteurized milk is used in making hard cheese, the package should be marked “aged 60 days” or longer. Don’t buy moldy cheeses, with the exception of some blue cheese or expensive Brie that ripen with harmless molds.
Storing cheese: Cheese should be refrigerated immediately upon arriving home. Store it in the original package until opened. After opening, rewrap cheese in moisture-proof wrap like aluminum foil, an airtight container, or a zip-lock bag. Keep your cheese in your meat and cheese drawer where it will not be exposed to light. When mold appears on solid cheese, cut off the mold, along with a half-inch piece surrounding it. What remains should be safe to consume. Cheese should be served at its recommended serving temperature, which will vary according to the type of cheese. Moist, soft cheese, like cottage cheese or mozzarella, should not be left out of the refrigerator for longer than 2 hours. Freezing cheese: Hard, natural cheese can be frozen. Cut into 1-inch thick, 1-pound sections and wrap tightly in plastic. Frozen cheese will keep for 6 to 8 weeks and should be thawed in the refrigerator. Allow 1 to 2 days for cheese to thaw. It loses some of its texture during freezing and, therefore, should be used for cooking.
Carol Ann
Carol Ann Kates is the award-winning author of cookbook, Secret Recipes from the Corner Market and Insider Grocery Shopping Secrets. She’s an expert in how to shop, select, and store produce for maximizing home cooking outcomes and minimizing time and money spent. As a former supermarket and deli operator, Carol Ann shares grocery-insider wisdom—the same expertise you used to receive when patronizing a mom-and-pop establishment. Contact her at CarolAnn@CarolAnnKates.com and explore her website, www.CarolAnnKates.com.
Copyright 2021 All Rights Reserved Carol Ann Kates
1
Searing the Beef
Sear beef fillets on high heat for 2 minutes per side to form a golden crust. Let it cool before proceeding to keep the beef tender.
1
Searing the Beef
Sear beef fillets on high heat for 2 minutes per side to form a golden crust. Let it cool before proceeding to keep the beef tender.
1
Searing the Beef
Sear beef fillets on high heat for 2 minutes per side to form a golden crust. Let it cool before proceeding to keep the beef tender.
1
Searing the Beef
Sear beef fillets on high heat for 2 minutes per side to form a golden crust. Let it cool before proceeding to keep the beef tender.
Notes


1
Season the good fresh beef fillets with salt and black pepper. Heat olive oil in a pan over high heat and sear the fillets for 2 minutes per side until it fully browned. Remove the beef from the pan and brush with a thin layer of mustard. Let it cool.
1
Season the good fresh beef fillets with salt and black pepper. Heat olive oil in a pan over high heat and sear the fillets for 2 minutes per side until it fully browned. Remove the beef from the pan and brush with a thin layer of mustard. Let it cool.
1
Season the good fresh beef fillets with salt and black pepper. Heat olive oil in a pan over high heat and sear the fillets for 2 minutes per side until it fully browned. Remove the beef from the pan and brush with a thin layer of mustard. Let it cool.
1
Season the good fresh beef fillets with salt and black pepper. Heat olive oil in a pan over high heat and sear the fillets for 2 minutes per side until it fully browned. Remove the beef from the pan and brush with a thin layer of mustard. Let it cool.
Instructions
Quality Fresh 2 beef fillets ( approximately 14 ounces each )
Quality Fresh 2 beef fillets ( approximately 14 ounces each )
Quality Fresh 2 beef fillets ( approximately 14 ounces each )
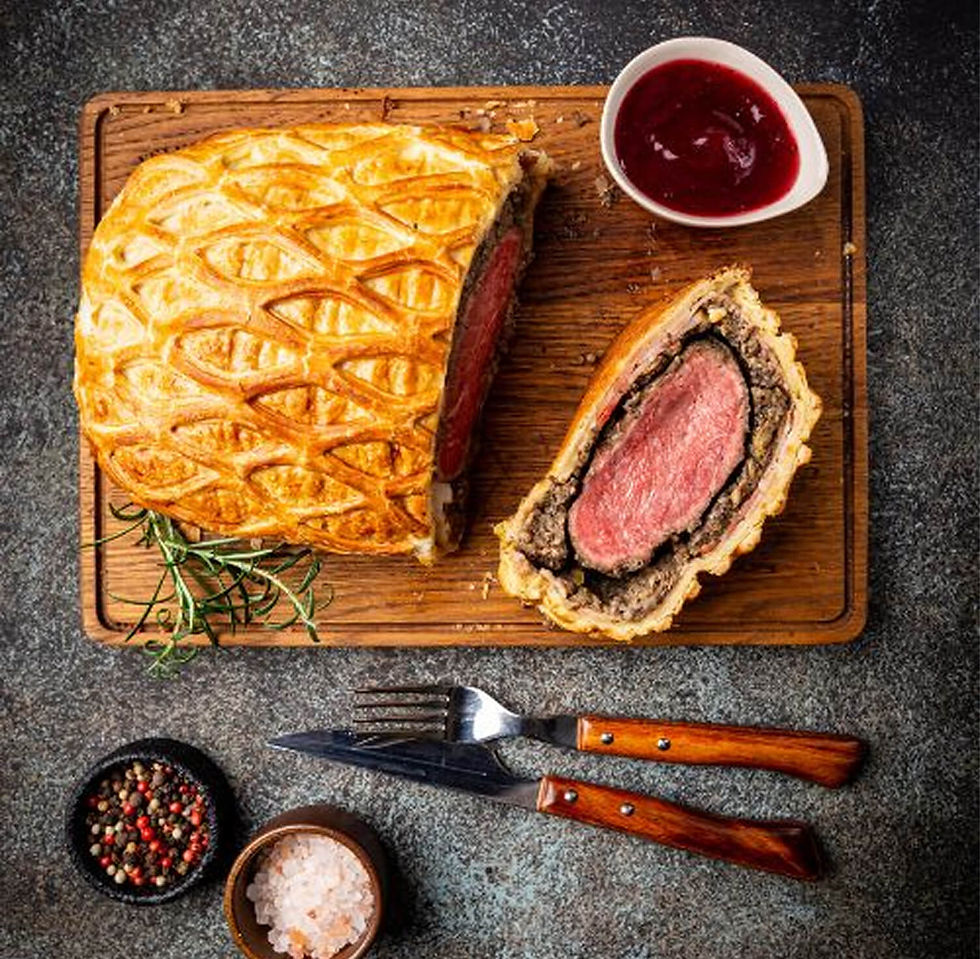
Beef Wellington
Beef Wellington
Fusion Wizard - Rooftop Eatery in Tokyo
Author Name
%20(1).jpg)
Beef Wellington is a luxurious dish featuring tender beef fillet coated with a flavorful mushroom duxelles and wrapped in a golden, flaky puff pastry. Perfect for special occasions, this recipe combines rich flavors and impressive presentation, making it the ultimate centerpiece for any celebration.
Servings :
4 Servings
Calories:
813 calories / Serve
Prep Time
30 mins
Prep Time
30 mins
Prep Time
30 mins
Prep Time
30 mins
Comments