
Peach Crisp—Easier than Pie
- Jul 29, 2022
- 2 min read

Have you ever heard the saying, “Easy as pie?” What if you want to make something that is easier than pie? Cobblers, crumbles, and crisps are delicious, “I-want-another-helping” desserts, yet they are all easier than pie to prepare.
Cobblers, crumbles, and crisps have many similarities. Each of these desserts showcase seasonal fruit, have a top crust but no bottom, and are baked and served in the same dish or pan. The fruit in each is thickened with flour, cornstarch, or tapioca; and each is topped with ice cream or whipped cream.
They do, however, have some distinct differences. A cobbler is a baked fruit dessert with a biscuit crust. Dollops of biscuit dough are dropped onto the fruit in small rounds. As the cobbler bakes, its top crust resembles a “cobbled” road. A crumble is a fruit dessert with a streusel-like topping. The name crumble is thought to have originated in England. A crisp also has a streusel-like topping, but the ingredients in its topping include oats. The topping of a crumble will not include oats. As a crisp bakes, the oats in the topping “crisp” up.
When Colorado “sink” peaches are in season (our peaches are so juicy we have to eat them over the sink), I love making peach crisp. It’s super simple to prepare; and, yes, it’s easier than pie. We love topping it with vanilla ice cream.
Carol Ann’s Peach Crisp Serves 6
This dessert is best topped with vanilla ice cream.
For the crisp topping:
½ cup quick cooking oats
½ cup honey sweetened granola
3 tablespoons all-purpose flour
½ cup packed brown sugar
¼ cup butter
Preheat the oven to 375 degrees F. In a medium bowl, combine oats, granola, 3 tablespoons flour, and brown sugar. Using a fork, cut in ¼ cup butter until the mixture is crumbly.
For the peaches:
6 cups fresh peaches, peeled, pitted, and sliced, about 6 or 7 peaches
1 tablespoon all-purpose flour
1 teaspoon ground cinnamon
½ teaspoon ground nutmeg
¼ teaspoon ground allspice
¼ cup pecans, chopped
1 ½ tablespoons butter
In an 8-inch square baking dish, place peach slices. In a small bowl, combine flour cinnamon, nutmeg, and allspice. Sprinkle the flour and spice mixture over peaches and toss gently.
Scatter the crisp topping over spices and then sprinkle with pecans. Dot with butter and bake for 50 minutes, or until top is golden brown. Serve with vanilla ice cream.
Shopping for peaches: Peaches should have a well-defined crease, a sweet fragrance, and be soft to the touch, not mushy. Do not buy peaches that have “green shoulders” around the stem end. This is an indication the peach was picked prematurely. Peaches with large, flattened bruises will not ripen well. If the skin of the fruit is shriveled at the stem end or has turned a red-brown color, the peach is over-ripe. Storing peaches: To ripen peaches, place them in a cool place, with their stem end down. If the peaches give slightly when pressed and begin to smell, they are ready to eat. Handle peaches gently as any bruising will show. Once ripe, these fruits will keep in the refrigerator 3 to 5 days.
Carol Ann
Carol Ann Kates is the award-winning author of cookbook, Secret Recipes from the Corner Market and Insider Grocery Shopping Secrets. She’s an expert in how to shop, select, and store produce for maximizing home cooking outcomes and minimizing time and money spent. As a former supermarket and deli operator, Carol Ann shares grocery-insider wisdom—the same expertise you used to receive when patronizing a mom-and-pop establishment. Contact her at CarolAnn@CarolAnnKates.com and explore her website, www.CarolAnnKates.com.
Copyright 2022 All Rights Reserved Carol Ann Kates
1
Searing the Beef
Sear beef fillets on high heat for 2 minutes per side to form a golden crust. Let it cool before proceeding to keep the beef tender.
1
Searing the Beef
Sear beef fillets on high heat for 2 minutes per side to form a golden crust. Let it cool before proceeding to keep the beef tender.
1
Searing the Beef
Sear beef fillets on high heat for 2 minutes per side to form a golden crust. Let it cool before proceeding to keep the beef tender.
1
Searing the Beef
Sear beef fillets on high heat for 2 minutes per side to form a golden crust. Let it cool before proceeding to keep the beef tender.
Notes


1
Season the good fresh beef fillets with salt and black pepper. Heat olive oil in a pan over high heat and sear the fillets for 2 minutes per side until it fully browned. Remove the beef from the pan and brush with a thin layer of mustard. Let it cool.
1
Season the good fresh beef fillets with salt and black pepper. Heat olive oil in a pan over high heat and sear the fillets for 2 minutes per side until it fully browned. Remove the beef from the pan and brush with a thin layer of mustard. Let it cool.
1
Season the good fresh beef fillets with salt and black pepper. Heat olive oil in a pan over high heat and sear the fillets for 2 minutes per side until it fully browned. Remove the beef from the pan and brush with a thin layer of mustard. Let it cool.
1
Season the good fresh beef fillets with salt and black pepper. Heat olive oil in a pan over high heat and sear the fillets for 2 minutes per side until it fully browned. Remove the beef from the pan and brush with a thin layer of mustard. Let it cool.
Instructions
Quality Fresh 2 beef fillets ( approximately 14 ounces each )
Quality Fresh 2 beef fillets ( approximately 14 ounces each )
Quality Fresh 2 beef fillets ( approximately 14 ounces each )
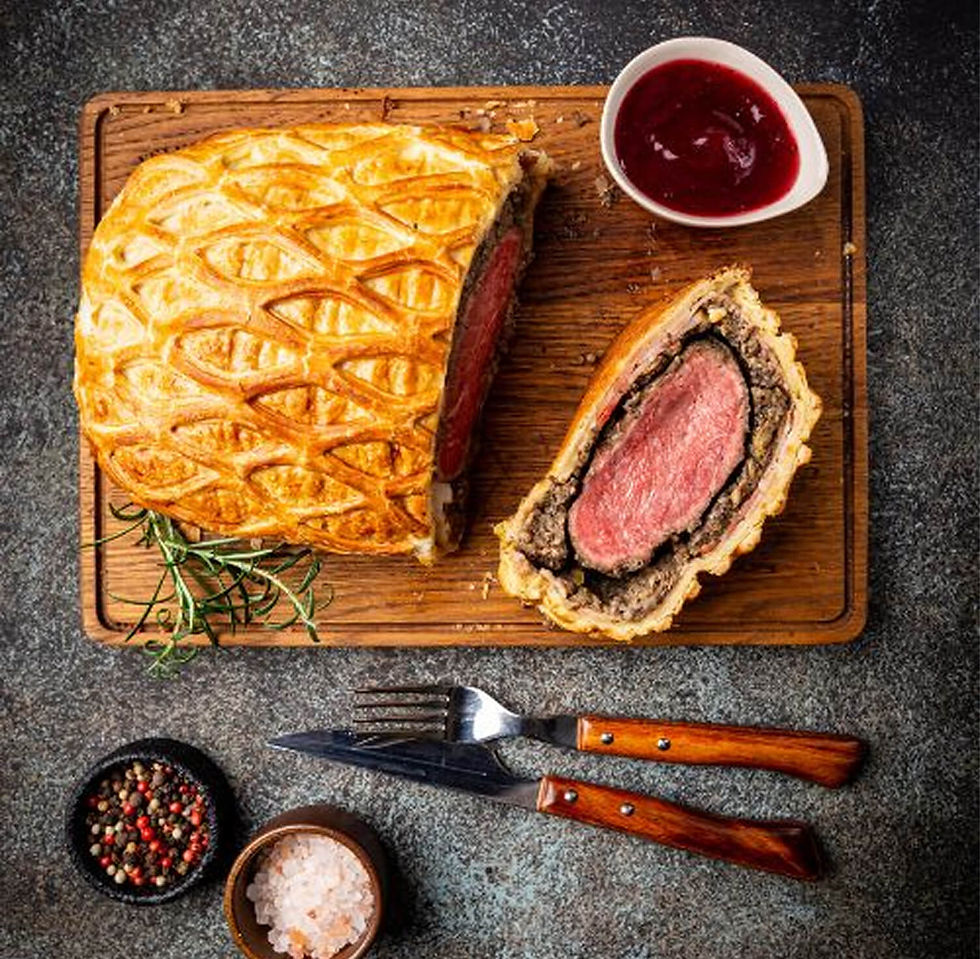
Beef Wellington
Beef Wellington
Fusion Wizard - Rooftop Eatery in Tokyo
Author Name
%20(1).jpg)
Beef Wellington is a luxurious dish featuring tender beef fillet coated with a flavorful mushroom duxelles and wrapped in a golden, flaky puff pastry. Perfect for special occasions, this recipe combines rich flavors and impressive presentation, making it the ultimate centerpiece for any celebration.
Servings :
4 Servings
Calories:
813 calories / Serve
Prep Time
30 mins
Prep Time
30 mins
Prep Time
30 mins
Prep Time
30 mins
Comentarios