
White Bean Chili with Chicken
- Rebecca Finkel
- Mar 24, 2023
- 4 min read

I find the history of chili, which is the official state food of Texas, quite fascinating. From the late 1860s to the 1930s, Hispanic women, called Chili Queens, made a fiery stew of beef and chiles in their home kitchens, transported it to various plazas in San Antonio, and sold the chili, corn tortillas, and a cup of coffee for the mere price of 10 cents. San Antonio’s Chili Queens are thought to be the purveyors of the first “fast food”.
From dusk to dawn, the Chili Queens dished up chili and other Mexican American favorites, like enchiladas, frijoles, and tamales, by the light of oil lanterns in Market Square, Military Plaza, and later Haymarket Plaza and Milam Park. They hauled in make-shift kitchens and either cooked or reheated their chili over mesquite fires. The sweet aroma of mesquite wood drifted through the plaza along with the buzz of conversation and laughter, the strums of guitars, and the songs of troubadours. The chili stands became an attraction for both locals and tourists alike—tourists often visiting the Chili Queens before they visited the Alamo.
Although their name sounds glamourous, Chili Queens worked the night shift in the hope of making a living for their families. They rented a plot of land in the plaza where they set up their booth, and each and every day, used a burro and a wagon to transport the necessary pots, pans, food, drinks, tables, and benches to their plot. Reminds me of my farmers’ market days. Pretty hard work.
Traditionally, the matriarch of the family did the cooking. She, no doubt, had the most experience in the kitchen and was the most accomplished cook. Her daughters worked in the booth and served the patrons. Diners came to the plaza for the food, but they stayed to enjoy the charming daughters who joked, flirted, and bantered with their customers.
Eventually, the Chili Queens were put out of business by the city’s Health Department, whose increasing tough health standards became difficult to meet. In 1980, the City of San Antonio instituted an annual “Return of the Chili Queens Festival” in Market Square to honor the state dish and the hard-working Chili Queens.

Following is one of my favorite chili recipes. It’s perfect for this time of year—hearty and comforting yet light and delicious. When I do book signings, I often take a pot of this chili along with me. It is always a crowd pleaser!
White Bean Chili with Chicken Serves 8
1 pound Great Northern white beans, rinsed and picked over In a large heavy kettle, place beans with enough cold water to cover them by at least 3 inches. Cover the kettle and soak beans overnight. The next day, drain beans into a large colander.
2 pounds boneless, skinless chicken breasts Place chicken in a large heavy saucepan. Add enough cold water to cover chicken and bring to a boil over a high heat. Reduce the heat to low and simmer until chicken is tender, about 15 minutes. Drain, cool, and reserve 4 cups of stock. Shred chicken into bite-size pieces and set aside.
2 tablespoons olive oil 2 cups white onion, chopped (about 1 large onion) 4 teaspoons minced garlic 2 cans (4-ounces) chopped mild green chiles 2 teaspoons ground cumin 1 ½ teaspoons dried oregano ¼ teaspoon cayenne pepper, or to taste 4 cups chicken stock (reserved from cooking chicken) 4 cups canned chicken broth 1 can (12-ounces) Coors® Light Beer, or your favorite brand 2 cups shredded Monterey Jack cheese In the same kettle used for soaking beans, heat olive oil over a medium-high heat. Add onions and garlic and sauté until translucent. Stir in green chiles, cumin, oregano, and cayenne. Sauté an additional 2 minutes. Add beans, chicken stock, and canned chicken broth. Bring to a boil. Reduce the heat and simmer until beans are very tender, stirring occasionally, 2 to 4 hours. Add chicken meat, beer, and cheese. Stir until cheese melts.
Suggested garnishes: shredded Monterey Jack cheese, pickled jalapeño slices, chopped red onion, sour cream, salsa, chopped cilantro leaves, tortilla strips
Serving suggestion: For a more festive presentation, line soup bowls with flour tortillas. Ladle chili into bowls. What kind of chilling process should I look for when I buy chicken? Chicken must be brought to a temperature of 40 degrees F after their feathers are removed. The industry standard immerses chicken in a cold-water bath. When chicken is cooled using this process, it will absorb some of this liquid, which makes it more costly. It will, also, often purge fluid into its tray, which dilutes the flavor and results in a soggy texture. Avoid buying chicken with an excess amount of liquid in its packaging.
A preferred process is air chilling, which circulates chicken through purified cold air to bring it to a safe temperature. Not all air chilling is the same. Some producers will use a combination of water and cold air and seek verification from the USDA as using an air-chilling process. Look for chicken that is 100 percent air chilled. Air-chilled chicken is more tender and has better flavor.
In addition, if you love grilled or pan-seared chicken with crispy, golden skin, air-chilled chicken is a better choice. Because no water was used in the chilling process, chicken skin remains taut and never soggy.
Because air-chilled chicken has not absorbed excess liquid, it is a better value. If chicken is air chilled, it will say so on its label.
Carol Ann
Carol Ann Kates is the award-winning author of cookbook, Secret Recipes from the Corner Market and Grocery Shopping Secrets. She’s an expert in how to shop, select, and store produce for maximizing home cooking outcomes and minimizing time and money spent. As a former supermarket and deli operator, Carol Ann shares grocery-insider wisdom—the same expertise you used to receive when patronizing a mom-and-pop establishment. Contact her at CarolAnn@CarolAnnKates.com and explore her website, www.CarolAnnKates.com.
Copyright 2023 All Rights Reserved Carol Ann Kates
1
Searing the Beef
Sear beef fillets on high heat for 2 minutes per side to form a golden crust. Let it cool before proceeding to keep the beef tender.
1
Searing the Beef
Sear beef fillets on high heat for 2 minutes per side to form a golden crust. Let it cool before proceeding to keep the beef tender.
1
Searing the Beef
Sear beef fillets on high heat for 2 minutes per side to form a golden crust. Let it cool before proceeding to keep the beef tender.
1
Searing the Beef
Sear beef fillets on high heat for 2 minutes per side to form a golden crust. Let it cool before proceeding to keep the beef tender.
Notes


1
Season the good fresh beef fillets with salt and black pepper. Heat olive oil in a pan over high heat and sear the fillets for 2 minutes per side until it fully browned. Remove the beef from the pan and brush with a thin layer of mustard. Let it cool.
1
Season the good fresh beef fillets with salt and black pepper. Heat olive oil in a pan over high heat and sear the fillets for 2 minutes per side until it fully browned. Remove the beef from the pan and brush with a thin layer of mustard. Let it cool.
1
Season the good fresh beef fillets with salt and black pepper. Heat olive oil in a pan over high heat and sear the fillets for 2 minutes per side until it fully browned. Remove the beef from the pan and brush with a thin layer of mustard. Let it cool.
1
Season the good fresh beef fillets with salt and black pepper. Heat olive oil in a pan over high heat and sear the fillets for 2 minutes per side until it fully browned. Remove the beef from the pan and brush with a thin layer of mustard. Let it cool.
Instructions
Quality Fresh 2 beef fillets ( approximately 14 ounces each )
Quality Fresh 2 beef fillets ( approximately 14 ounces each )
Quality Fresh 2 beef fillets ( approximately 14 ounces each )
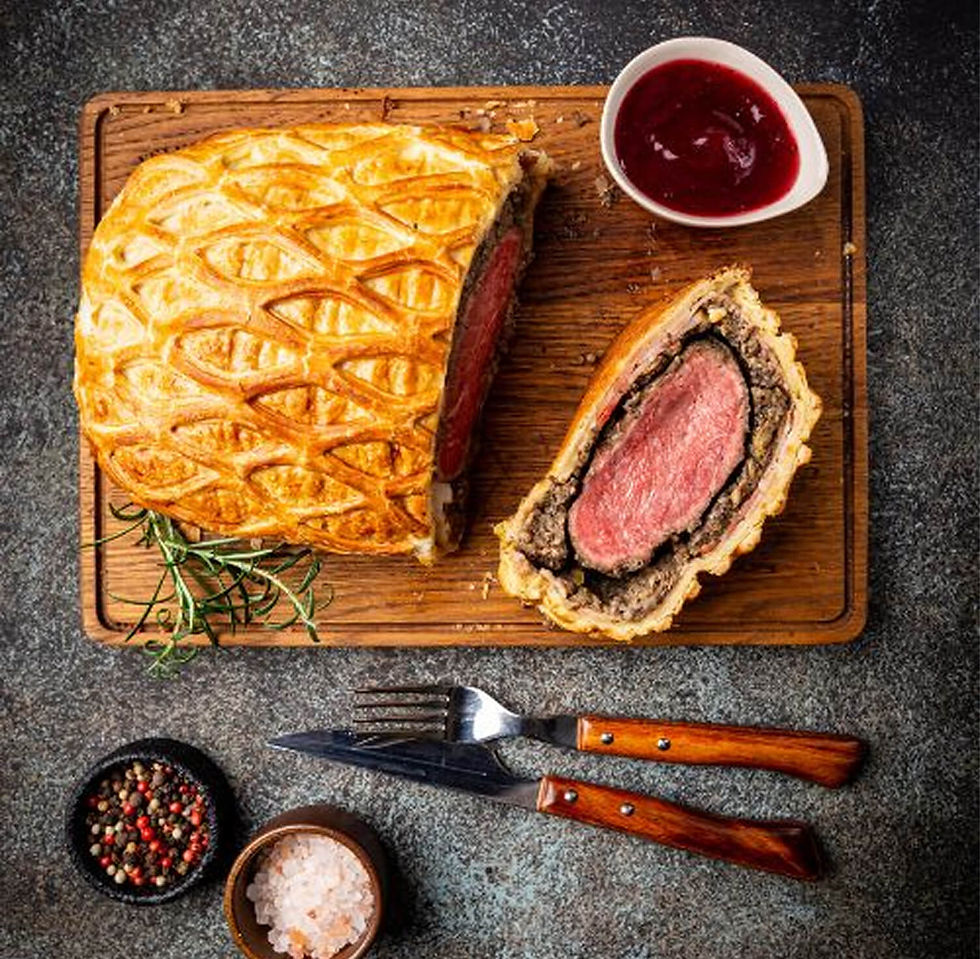
Beef Wellington
Beef Wellington
Fusion Wizard - Rooftop Eatery in Tokyo
Author Name
%20(1).jpg)
Beef Wellington is a luxurious dish featuring tender beef fillet coated with a flavorful mushroom duxelles and wrapped in a golden, flaky puff pastry. Perfect for special occasions, this recipe combines rich flavors and impressive presentation, making it the ultimate centerpiece for any celebration.
Servings :
4 Servings
Calories:
813 calories / Serve
Prep Time
30 mins
Prep Time
30 mins
Prep Time
30 mins
Prep Time
30 mins
Comentarios